Friday, August 3, 2018

Lessons Learned from Teaching Kids on Mountain Bikes


I'm participating in the MTBoS blog challenge called Blaugust. If you want to see a full list of the bloggers participating in Blaugust, click on the image above. My goal is to blog once per week for the month of August, then to continue blogging weekly throughout the school year. I've got a lot to write about from this summer and about the upcoming school year but I'm still trying to process it all, so those will be coming later...


For now I'm going to write about a few of the lessons I learned this week. On Tuesday & Thursday, I spent my day coaching at our local Kids Mountain Bike Camp which is hosted by Boone Area Cyclists and Watauga County Parks & Recreation. If you have spent any time getting to know me, you know that I love teaching kids and I love biking; being able to do both at the same time is aMaZiNg and makes my heart happy! So most would think that it would be a no brainer for me to help coach a kids mountain bike camp but it actually terrified me.


I've helped coach at mountain bike camp the past two summers and both times I've almost chickened out after agreeing to help. I do not consider myself to be an awesome mountain biker, I still consider myself to be a novice and have a lot to learn about mountain biking. I feel inadequate to help kids when I barely know more than some of them and the majority of the kids have skill sets higher than my own. Plus the camp is held at Rocky Knob Park, where I had a freak accident in April 2017. Even though I've rode the trail multiple times since that day, I definitely have anxiety about being on that trail.  However, both summers have proven to be such a great experience for me and I'm so glad I didn't chicken out!


This summer (just like last) I willing volunteered to work with the beginner shredders - these are kids that may or may not have been on trails before but do have experience with riding bikes. We spent our days working on handling skills and getting comfortable with maneuvering on a trail. With these kids we spend a lot of time at the pump track and then get up on our beginner trail called "Keen-dergarden." By the end of the week, the majority of the beginner group is able to move on to the next trail but there is always one or two that need extra practice with this trail.  I don't know if it's because I enjoy rejoicing in the small things or because I can actually teach them something but I've discovered that this is the group that I love to work with.

This week, I worked with the group on Tuesday and noticed a rider was not at the level of the others in the beginner shredder group, so when I arrived on Thursday I gladly volunteered to work with him. We try not to single out the kids, so we either divide up the groups ahead of time or have options and let the kids decide which group they want to join.  To divide up the groups on Thursday morning, we let the kids choose their groups and I offered a Pump Track & Keendergarden group - to my surprise five kids wanted to be with me and my NICA student coach, Ethan. (He will be a freshmen at my school in the fall and I so hope to be his math teacher one day!)  Ethan and I quickly realized that our group of five was made up of 4 kids that could easily ride the trails but wanted a chill day and the 1 kid that was not at the level of others.


Ethan & I decided that we were going to need to split into two smaller groups and I figured at this point I'd be spending my day with the one kid. I was fine that that because I knew that I would work with him on small sections of the trail and we wouldn't move on until he could ride each portion. My goal was to get him comfortable riding his bike on the trail. When it came time for the kids to choose which mini-group they wanted to be a part of, a kid spoke up and said "I don't care, I just want to ride with my friend."  I was excited to have a second kid to work with but I was a little hesitant. I hate to stay it but in my mind I kept thinking, "Once we get up on the trail you will realize how long this will take and that we really won't be riding, you're going to regret this decision."  Little did I know that I was about to learn a lot about friendship from this kid and I'm so thankful that I didn't discourage him from joining his friend.


We ended up working on 3 small sections on the Keendergarden trail - two switchbacks, one to the left and one to the right, and a small section that has a little (3' long) wooden bridge.  We probably spent 30 minutes at the first switchback and 20 minutes at each of the other sections; at each section the same thing would happen. At first, the friend would be leading our little group and he would do the section. Behind him was the kid that was needing help and would try to do what his friend did.  I was behind him talking him through what he should be focusing on. When the kid got to the point where he had to come off the bike, we would stop and all get off of our bikes.  I would then talk through what to be looking at during each part of the section, where his bike should go, and then we'd walk the section as if we were on our bikes.


At this point, his friend would grab his back and return to the beginning of the section. He would ride his bike to demonstrate what it should look like while the other kid and I would stand off trail and watch. Then the kid that was needing the help would go to his bike and try. I would be coaching him and his friend stood near me, cheering him on. After each failed attempt his friend would go to where he was, offer a smile, and give him a little word of encouragement. Such as: "You are doing so great!" "You almost made it this time, I know you'll get farther next time! " Don't worry, this is hard but I know you can do it!" Then I'd have the kid talk through what went wrong and what he needed to do in order to ride the section and he'd try again.  We would repeat this as many times as necessary for the kid to master the section and each time, I'd stand in amazement as his friend cheered him on. But for me the best part for me was the first time the kid was able to fully ride one of the sections. His friend would scream in excitement and run to where he was and give him a high-five and tell him how proud he was of him.


This happened at EVERY. SINGLE. SECTION with no loss of genuine encouragement or enthusiasm. As we were riding down the trail to head to lunch, I realized that I want to be like this kid's friend and here are the three lessons that I will carry with me forever.  I know these lessons will make me a better friend, teacher, wife, aunt, and overall person.

1. When someone is afraid, I will smile and offer words of encouragement.
2. I will celebrate someone else's victory, whether small or large, like it is my own.
3. I will choose to spend time with the people I love, even when I could be doing other things, because I simply want to be with them.

I thought that coaching at mountain bike camp would allow me to teach kids about riding bikes, which it did, but the impact I'll carry with me is far greater than what I taught kids. 


Sunday, March 11, 2018

Factoring GCF Foldable

This semester has not gone as I had planned but things are finally changing. And that's a good thing, a very good thing! Next week I will introduce factoring to my Math 1 students. This is the first time they will have seen this skill and we will start by factoring out the greatest common factor (GCF).

This weekend as I was planning, I decided I wanted to create a fun foldable for students that had them find the GCF of a polynomial and factor out the GCF. I remembered the foldable that I had used in previous years from Dividing by Zero, another Mrs. Williams that teaches math, for exponent rules. I decided that this would be the perfect style of foldable and that my students would either love or hate me for it.

I started by creating the foldable with scratch paper, so that when I went to create the actual foldable, it would be easier to see what went where. I was so excited that I tweeted about it. :)


Once I had the basic idea made I created the foldable using Publisher. I'm quite pleased with how well it turned out.


Here are the links where you can download these files:

How to Print: 
Print Page 1 by itself and one sided. 
Print page 2-3 together, printing on both sides of the paper and flip sheets on the short side.  (This creates the extra portion that you will weave in and out. There are two copies on this page.)

Putting it Together:
The other Mrs. Williams, Divide by Zero, gives better directions and with more pictures. 

Take Page 1 - Fold it in half and then fold each half to the center. It will look like an accordion. 


Then you will need to cut along the dotted lines. To do this, fold the paper in half and cut from the center fold to the outside fold. 

Take Page 2, you only need 1/2 of it.  Of the half, cut it into two strips. 


Take the portion of Page 2 with the polynomials and weave it above & below the polynomials printed on the left side of Page 1. 


Then repeat with the portion of Page 2 that has GCF listed - weave it above and below on the right side of Page 2. It will look like a checkerboard.   If you turn the entire foldable over, it will be blank. 


The super awesome part about this foldable is that it has a secret, hidden portion. If you begin to fold the foldable up towards the center, you will see that it will start to open up. You can gently pull it apart and it will reveal the secret portion of the foldable. Which for this one, has where students will factor the polynomial. 


I hope my students will enjoy this foldable as much as I do. If not, at least I fun creating it. :)


Saturday, November 4, 2017

Parallel and Perpendicular Lines

My Introductory Math students learned about parallel and perpendicular lines this week. My wonderful math intern from Appalachian State University taught my students how to identify lines as parallel, perpendicular, or intersecting from graphs and equations. The following day I was set to teach my students how to write the equation of a line parallel or perpendicular to a specified line going through a specific point, but I wasn't sure how I was going to teach it. I knew my students were struggling with their algebraic skills and I was nervous about how they would learn the material if the algebra was getting in their way, although I didn't know how to teach it without this being an issue.... Cue Tuesday morning and a conversation with a former student.

On Tuesday morning during my Math FLEX session, I had a former student come by to get help in her current math class. She is currently working on transformations of geometric figures and she was struggling with rotations. In her class, they had been using the rules for rotations. I started by reviewing the rules with her, then showed her I keep track the different rules.  I could tell that this wasn't working for her.


I decided to get out some graph paper and show her how to graph the rotations and from there she could come up with the image coordinates. All of a sudden her there was light behind her eyes, where there was once fear, and I could see the joy in her face. She saw how rotations worked and understood what it meant. It wasn't another rule for her to memorize, it just made sense.  I was elated for her and at the same time a little disappointed that I didn't start with the picture first.

How often do our students need to see something concrete, like a graph, before moving onto the abstract, like algebraic rules?   The answer is probably 99% of the time, especially for students have difficultly in math. 

Throughout the day I kept thinking back to this student and how excited I was for her; not only for the knowledge she gained but that there was a simple solution to helping her understand.  All she needed was to SEE what was happening!  

During my planning period on Tuesday, I realized I had to finalize my plans for writing parallel and perpendicular equations. It was Halloween and I was going to spend time with my nieces, so I wouldn't be home until late and I knew I wouldn't want to finalize my lesson plans once I got home.  I thought back to working with the student on rotation and I had an epiphany, what if I taught my students how to graph parallel and perpendicular lines before I taught them how algebraically find the equation?  It made sense in my head but I wasn't so sure it was the right thing to do, or that they would understand and see the connection. 


(My nieces dressed as Descendants Uma and Evie for Halloween.)

My co-teacher wasn't at school, so I couldn't run the idea by her. So I did the next best thing, I went down the hall to visit another teacher and ran my idea by her. She loved it and thought it would work.

Now, I just needed to figure out how to create a foldable for our interactive notebooks to include this new part of my lesson.  In the foldable I wanted to include parallel and perpendicular lines, writing equations by graphing and using algebra, and I wanted it to have an order to it. The teacher I was talking to suggested a flip book and I jumped on the idea. 


I knew that Kathryn had a template for a flipbook because I had used it before so I re-downloaded the template and whipped up a foldable. The foldable came together so quickly and I was excited that I had the time to think about it, talk it over with another teacher, and then create it before leaving for the day. However, I wasn't too sure how it would go over with my students.  I didn't know if it would make sense or if it would be too much at one time.


We spent the next two days on writing equations of parallel and perpendicular lines, beginning with graphing, then with algebra. It went amazing, so much better than I expected. This was the first time  that my students could write the equations of parallel and perpendicular lines after only seeing it a couple of times.  While students were practicing, I kept walking by my co-teacher and our interns and would say, "I just can't believe this; the students understand and can do it!" 


I'm happy to report that after two days of working on parallel and perpendicular lines, over 90% of our students had mastered this skill. I don't have the data from previous years but I can say without a doubt, it wasn't that high of a percentage of students nor was it that quickly.


I'm so glad that with the help of a former student and fellow teacher, I was able to remember the power of a picture!

After tweeting about this experience, Tim Brezezinski replied with a link to a geogabra investigation on parallel and perpendicular lines. I plan on using this as one of my stations during our unit review next week!

Here are the links where you can download these files. Here's a pdf copy and an editable Word document. Graphs created with GraphFree.com  (Printing note: You will need to print on both sides of the page, flipping on the short edge.)

Wednesday, October 25, 2017

War: Comparing Slopes & Y-intercepts

I haven't been blogging lately because life has been busy and I never seem to find the time. However yesterday I posted a picture on Twitter of an activity I did with my Introductory Math students and  large number of people asked for files of an activity. I figured the easiest way would be to blog about it and share the files.

There have been a lot of changes since I last blogged in May 2016. I have switched jobs and started teaching in different school district,  where I began teaching a new course for me, AP Statistics, and had three preps. My new school also has a different schedule that I had to get accustomed to: my planning period alternates every other day, half of my classes are on a block schedule, the other half are on an A/B modified block schedule.  I really love where I'm teaching, what I'm teaching, and my schedule, but it was a lot of changes in a short amount of time.

On top of that, my husband and I sold our previous home and bought a new house.  Now I don't have a lot of time because I'm working on completing my National Board Certification and decided to start doing Standards Based Grading with my students. Which is A LOT of work the first year!

That's enough of a tangent, I'll actually get to my post about comparing slopes and y-intercepts war.
......

After my students played Sarah Carter's @mathequalslove, Evaluating Functions War, they insisted that we play War again. We ended up having a two hour delay on Tuesday because of flooding, so I had time to create a card set for my students to play War again.

We are currently working with linear functions and students needed continued practice with identifying the slope and y-intercept from various representations. So I figured I'd create a set of cards for students to play War and compare slopes and y-intercepts from multiple representations. I  ended up created 18 different cards with linear functions.


I printed these pages should that every student had one of the two sets of functions. I printed these on different colors of paper to make it easier to sort out the cards in the beginning of the game. I went ahead and grouped 4 sets of cards together into bags so that it would be easier to distribute the groups.

I then went over the directions for playing War, if needed, see Sarah's general explanation. Here's how I adapted it for these cards and for my students.

1. Distribute the cards to each player. Each player should get 9 cards of a matching color. Each player should shuffle their deck several times.

2. At the beginning of each round and every 3-4 minutes of the game I'd call out "greatest slope wins" or "smallest y-intercept wins." After all, I needed students to practice finding slope and y-intercept, then comparing their values.

3. Each player turns over their card and determines the slope/y-intercept.

4. The player with the highest or lowest (depending on the rules stated out loud), wins every other players' cards. These cards will go on the bottom of their stack.
5. Repeat #3 and #4 until one player runs out of cards. Once a player has run out cards, the remaining players count the number of cards they have and the player with the most cards wins. Another round is played if time allows. (This allowed all students to be engaged the entire time we were practicing.)

Note: If two or more players had identical slopes/y-intercepts, each of those players turned over a new card to act as a tie breaker.


It worked really well and all of my students, even those that are reluctant to do anything in class, enjoyed this activity.


Here are the links where you can download these files. Here's a pdf copy and an editable Publisher version. Now that I've blogged again, I'm going to try keep and and blog on a more regular basis. 

Wednesday, April 27, 2016

Congratulations, Jodi!

Meet my friend, Jodi Grubb. 


Jodi is an exceptional children's teacher at Ashe County Middle School and toady she was named the 2016-2017 Ashe County Teacher of the Year. She is most deserving of this honor and recognition and I’m proud to call her my friend. Jodi is a fabulous educator who constantly advocates for all students and she always focuses on the positive. She knows that all students are capable of learning and pushes them to new heights every day. Jodi doesn't give up on students, even when it looks like all hope is lost. It is during those times that Jodi shines, she will find a way to help that student persevere and reach their goal (even if it means they need to take a nap first!)


Here’s just a few ways that I’ve been a part of the exceptional things that Jodi does:
  • If you need someone to remind you why you’re teaching when you’ve had a bad day, Jodi will always have a crazy story from her day that puts your day in perspective.
  • If you happen to get stuck on a ferry, you want Jodi on that ferry because she will come up with a song that will make you and 85-8th graders make a happy memory out of a bad and unavoidable situation.
  • If you have a crazy idea to implement something into your classroom, Jodi will tell you what a fabulous idea it is and ask how she can help.
  • If you need someone to proofread your grant application or portfolio an hour before you need to turn it in, Jodi will read your writing,  help you make changes, and actually make you sound intellectual. 
  • If you lack coordination and have doubts about performing on stage, Jodi will convince you to dance to Uptown Funk in front of the entire school and in the front row and you’ll enjoy it.
  • If you want to discuss fractals with someone, Jodi will not only show you how cool they are but tie it into life.

But most importantly, if you want to truly be blessed, spend a day in Jodi’s classroom to see how hard she works with her students and the great things they accomplish together. I am fortunate to know Jodi and because of her I am a better person and teacher.


Congratulations, Jodi.  I love you!


Tuesday, April 26, 2016

Presenting on LEGO Math


I was invited to speak at the spring Math Night at a local elementary school about using LEGO bricks to enhance mathematical skills. I presented to a group of 3rd-6th grade students and their parents; we used the LearnToLearn curriculum by LEGO Education.
With Title 1 money, the school was able to buy a kit for every student in attendance and have extra sets to use in the classrooms. Their K-2 students had participated in LEGO Math at the fall Math Night. The goal of this workshop was to help answer the question, "How can you use LEGO bricks at home to strengthen math skills?"

I started by going over LEGO Education's 4C Learning Process: Connecting, Constructing, Contemplating and Continuing. In all phases, role of the parent is to guide their child to help them reach their solution through questions, dialogue, and building together.

Before we gave the LEGO bricks to students, I reviewed symmetry with them. I had student volunteers go over lines of symmetry with the images below.


 With the help of the 3rd-6th grade teachers, we passed out Lego kits and a packet with instructions and various activities for the students and parents to begin practicing with.


I briefly described the activity called "Mirror Mirror." This activity reinforces the concepts of symmetry, as students are to build something that is symmetrical (either with the shape or color) and then they are to engage in a discussion with their parents. Some possible questions included:
  • How did you decided on your design? 
  • How can you check that your design is symmetrical? 
  • Can you show me the middle (symmetrical line) of your design? 
  • Are there any other lines of symmetry?
Then the fun started as students began to build and have excellent discussions with their parents.


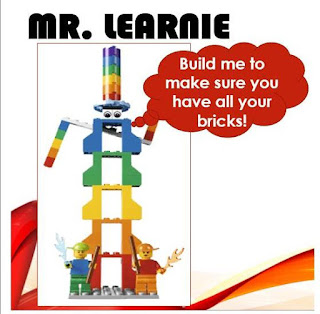
The packet the students were given contained other LEGO activities that incorporated math concepts such as "Block and Cover," "What's Behind My Back," and "Balancing Act." However, since the allotted 45 minute time slot was quickly coming to an end, we finished by having students build Mr. Learnie. Mr. Learnie was created by Designer Ina in Denmark and every brick in the set is needed to make him. So is students are able to build Mr. Learnie, they know they have their entire set of LEGO bricks.


Overall, it was a great evening and I was honored to be asked to present.